Star Trek Adventures
As an avid Star Trek and Roleplaying Games fan, when I saw Modiphius Entertainment's new Star Trek Tabletop Roleplaying game, I just had to try my hand at building a digital tabletop solution...
As an avid Star Trek and Roleplaying Games fan, when I saw Modiphius Entertainment's new Star Trek Tabletop Roleplaying game, I just had to try my hand at building a digital tabletop solution...
As an avid Star Trek and Roleplaying Games fan, when I saw Modiphius Entertainment's new Star Trek Tabletop Roleplaying game, I just had to try my hand at building a digital tabletop solution...
About the project
During COVID, I really enjoyed playing online tabletop roleplaying games with my friends. Star Trek Adventures was a relatively new release, and as such had no dedicated way to be played online. As an expert in Figma, I knw that it had the capabilities to be used in this way - I just had to design something that was user-friendly enough that even someone brand new to Figma could jump in and use it.
During COVID, I really enjoyed playing online tabletop roleplaying games with my friends. Star Trek Adventures was a relatively new release, and as such had no dedicated way to be played online. As an expert in Figma, I knw that it had the capabilities to be used in this way - I just had to design something that was user-friendly enough that even someone brand new to Figma could jump in and use it.
During COVID, I really enjoyed playing online tabletop roleplaying games with my friends. Star Trek Adventures was a relatively new release, and as such had no dedicated way to be played online. As an expert in Figma, I knw that it had the capabilities to be used in this way - I just had to design something that was user-friendly enough that even someone brand new to Figma could jump in and use it.
Date:
Jul 25, 2020
Client:
Personal Project
This was a COVID experiment that really pushed the bounds of what is possible to do in Figma. Please note that this was built before Variables and Conditional Logic was released to Figma - something that would have totally changed the game for this project!


Reproducing LCARS
I decided to base my design on the classic Star Trek "LCARS" interfaces, which were used for The Next Generation, Deep Space 9, and Voyager. This was great for an authentic Star Trek look and feel, but I would need to make adjustments for usability.
While I kept the core style of the LCARS interface, I used a much more readable font and more vibrant color treatments. Unless you’re a die-hard Star Trek fan, I don’t think the difference is particularly noticeable, but it made a huge difference to the readability of the UI, as you'll see in the screens below.
Map Layout
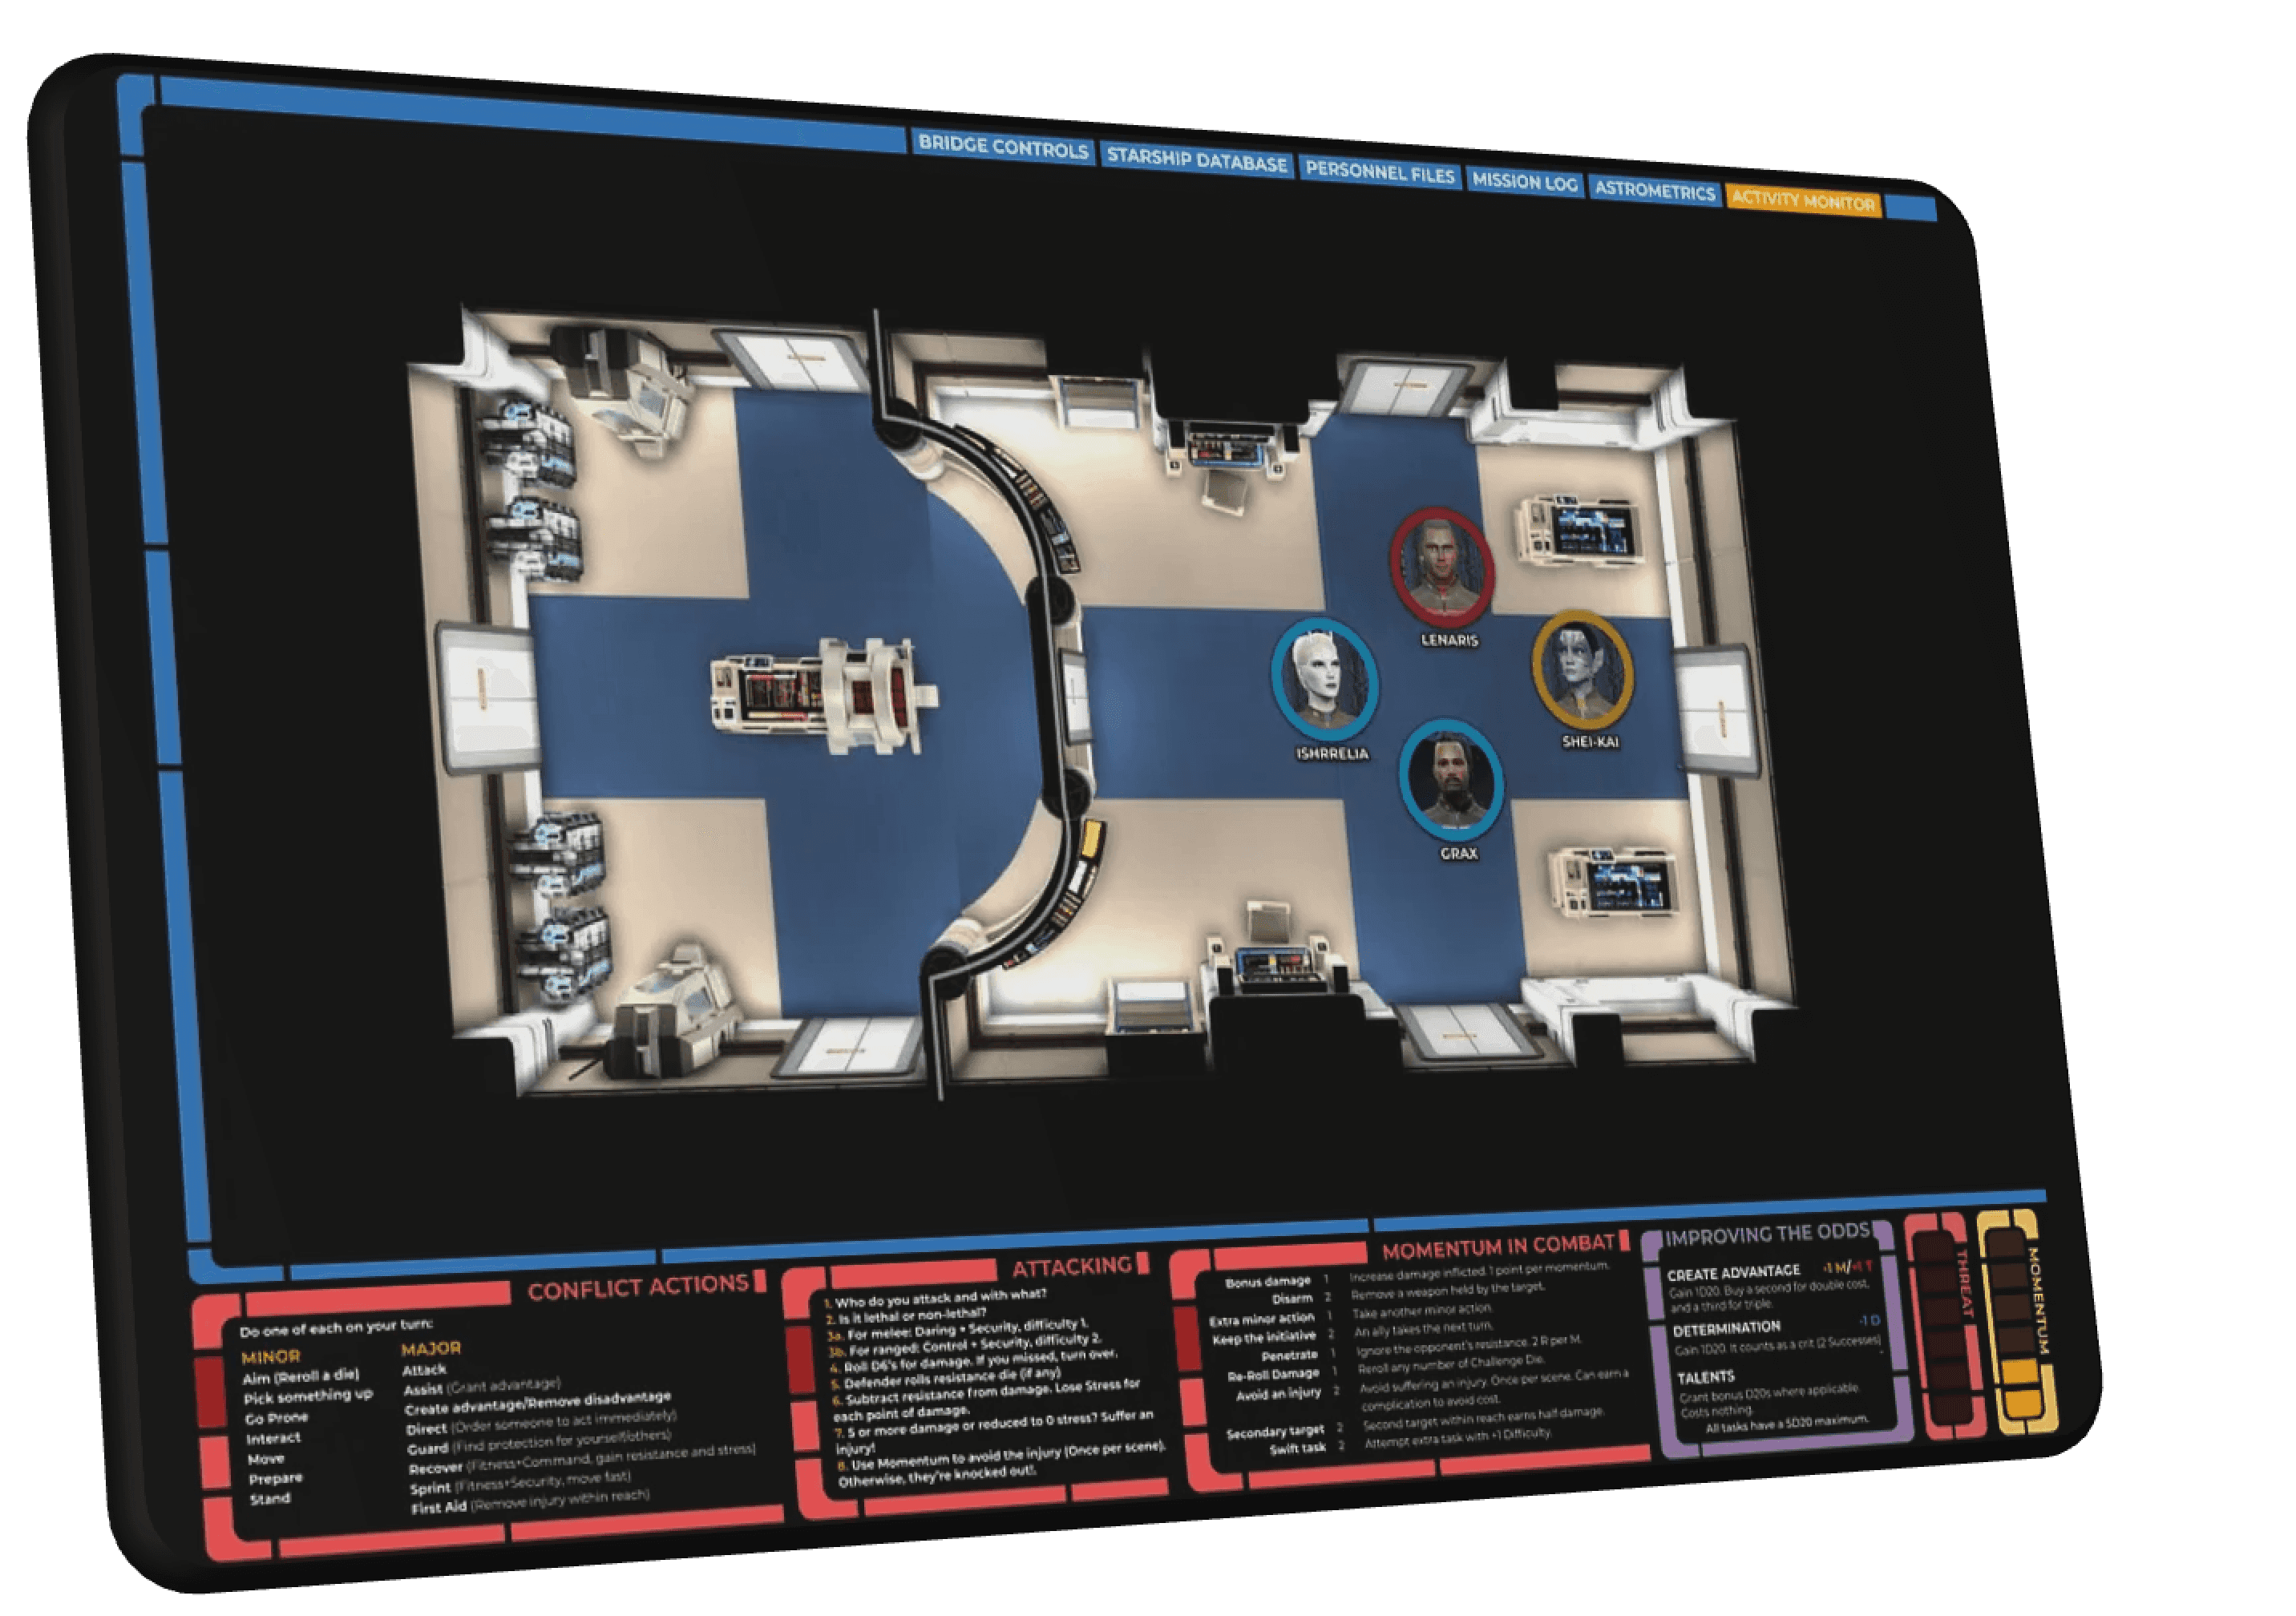
I started with building out a screen that contained all the core functionality you'd expect from a Virtual Tabletop (VTT). This included a map, a log, and a quick reference chart of actions and abilities.
I knew I was going to make this interactive, so I also included elements like navigation, character tokens, and even resource management - as I progressed through my prototype, I added state machines using component variants to make these functional.
Map Layout
I started with building out a screen that contained all the core functionality you'd expect from a Virtual Tabletop (VTT). This included a map, a log, and a quick reference chart of actions and abilities.
I knew I was going to make this interactive, so I also included elements like navigation, character tokens, and even resource management - as I progressed through my prototype, I added state machines using component variants to make these functional.


Other Interface Styles
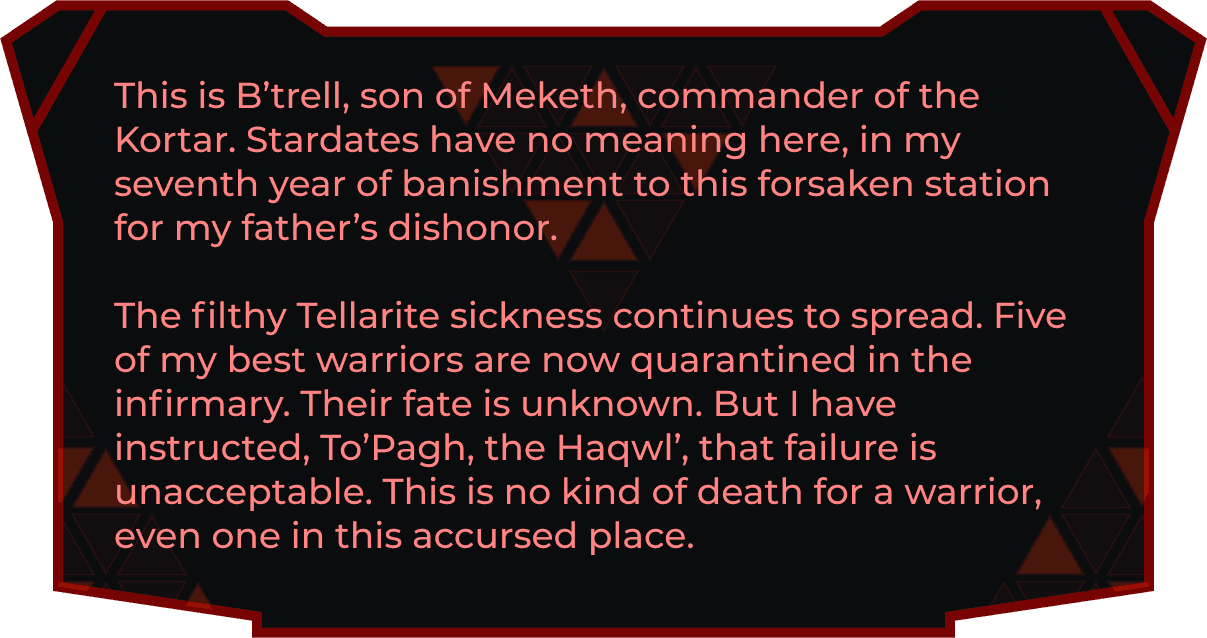
While 90% of the interface would match the LCARS display language, I also knew my players would encounter other cultures who had their own styles. I emulated a few of these also, such as the Klingon once displayed above.
Readability was paramount, so I made the decision to keep the core font the same, and just update the 'window dressing'.
As we played the game, I logged the actions players and NPC's took, as well as information they learned as the plot progressed.
While some of this was inputted manually, I was also able to use component variants to show and hide information as it become available. For example, if a certain item was discovered, I could simply switch that item from the 'Hidden' variant to the 'Discovered' variant, and the players (who were viewing the interface from a prototype URL) would now see it in their inventory.
This included the action log, which had blocks of text in a vertical auto-layout, so chunks could be flagged as visible as the players discovered that information, or an event took place.
Other Interface Styles
While 90% of the interface would match the LCARS display language, I also knew my players would encounter other cultures who had their own styles. I emulated a few of these also, such as the Klingon once displayed above.
Readability was paramount, so I made the decision to keep the core font the same, and just update the 'window dressing'.
As we played the game, I logged the actions players and NPC's took, as well as information they learned as the plot progressed.
While some of this was inputted manually, I was also able to use component variants to show and hide information as it become available. For example, if a certain item was discovered, I could simply switch that item from the 'Hidden' variant to the 'Discovered' variant, and the players (who were viewing the interface from a prototype URL) would now see it in their inventory.
This included the action log, which had blocks of text in a vertical auto-layout, so chunks could be flagged as visible as the players discovered that information, or an event took place.

Navigation
As the design came together, I built the entire interface as a clickable prototype, so that my players could navigate independently using prototype links.
This was fantastic for usability - they could check the wiki or their character sheet, and then return to the map which would be updated live as the game state changed.

Interactive Map
I wanted an experience similar to Google Maps for my players to navigate their galactic map. This was actually pretty easy to do - I used scrolling overflow settings to allow them to pan around the map, and made any object on the map clickable so that it launched a modal overlay with more information.
One challenge I wasn't quite able to solve was zoom - although I later figured that out by using multiple variants of the map that were scaled up or down, and then some + and - buttons that simply swapped between variants. This wouldn't remember the exact scroll position of the map, but it was otherwise very close to a native maps experience.
Piloting the Ship
A huge part of any Star Trek story is the operation of your Starship. I wanted to use this element of gameplay as an opportunity to create something truly diagetic - it should feel like you're on the bridge, at your console, running the starship.

Report to the Bridge
Players could enter the Bridge at any time, and choose which seat they'd like to take up. Each seat had it's own unique set of controls, but all seats had the same view of the Starship itself and the surrounding area.
Report to the Bridge
Players could enter the Bridge at any time, and choose which seat they'd like to take up. Each seat had it's own unique set of controls, but all seats had the same view of the Starship itself and the surrounding area.
Report to the Bridge
Players could enter the Bridge at any time, and choose which seat they'd like to take up. Each seat had it's own unique set of controls, but all seats had the same view of the Starship itself and the surrounding area.


Player Roles
In Star Trek Adventures, different players are responsible for different sections of the ship. I gave each role it's own UI, and used the colors from the show to make it easy to differentiate between them.
I also took the opportunity to create unique diagetic UI for each console. The engineering console has a cross-section of the ship, the science console has transporter and deflector dish controls, and so on.

Nested Instances
One major challenge (or so I thought) of this project would be syncing all the different screens in the prototype so that all players would be seeing up to date information. This was actually relatively straight forward using components - I simply created 'master' components of any UI element that needed to stay up to do date, and made my changes there.
Here I've included what it looks like when the master component is updated. Functionally, these other screens are simply nested instances - all positions on the bridge have a component containing their controls, but all those unique components store a shared instance of the map component.
The most interesting thing about this screenshot is that at the time of writing, I was using Figma in light mode…!

In-Context Rules References
Because each of my screens was built around a certain part of the play experience, I realised I could actually provide the rules and guidelines for how to play Star Trek Adventures directly in the interface.
I added modal overlays for all of my controls, so that users could click on any control to see how it functioned from a gameplay perspective. This meant nobody was taking time to reference their rulebook during play - if they had a question, they simply clicked on the relevant control module to see the applicable rules reference.
Other Assets
As our adventures continued, I created many UI elements for the players to explore and interact with to keep the game immersive and maintain that classic Star Trek feel. Below I've included just a few quick examples.

In-Game Puzzles
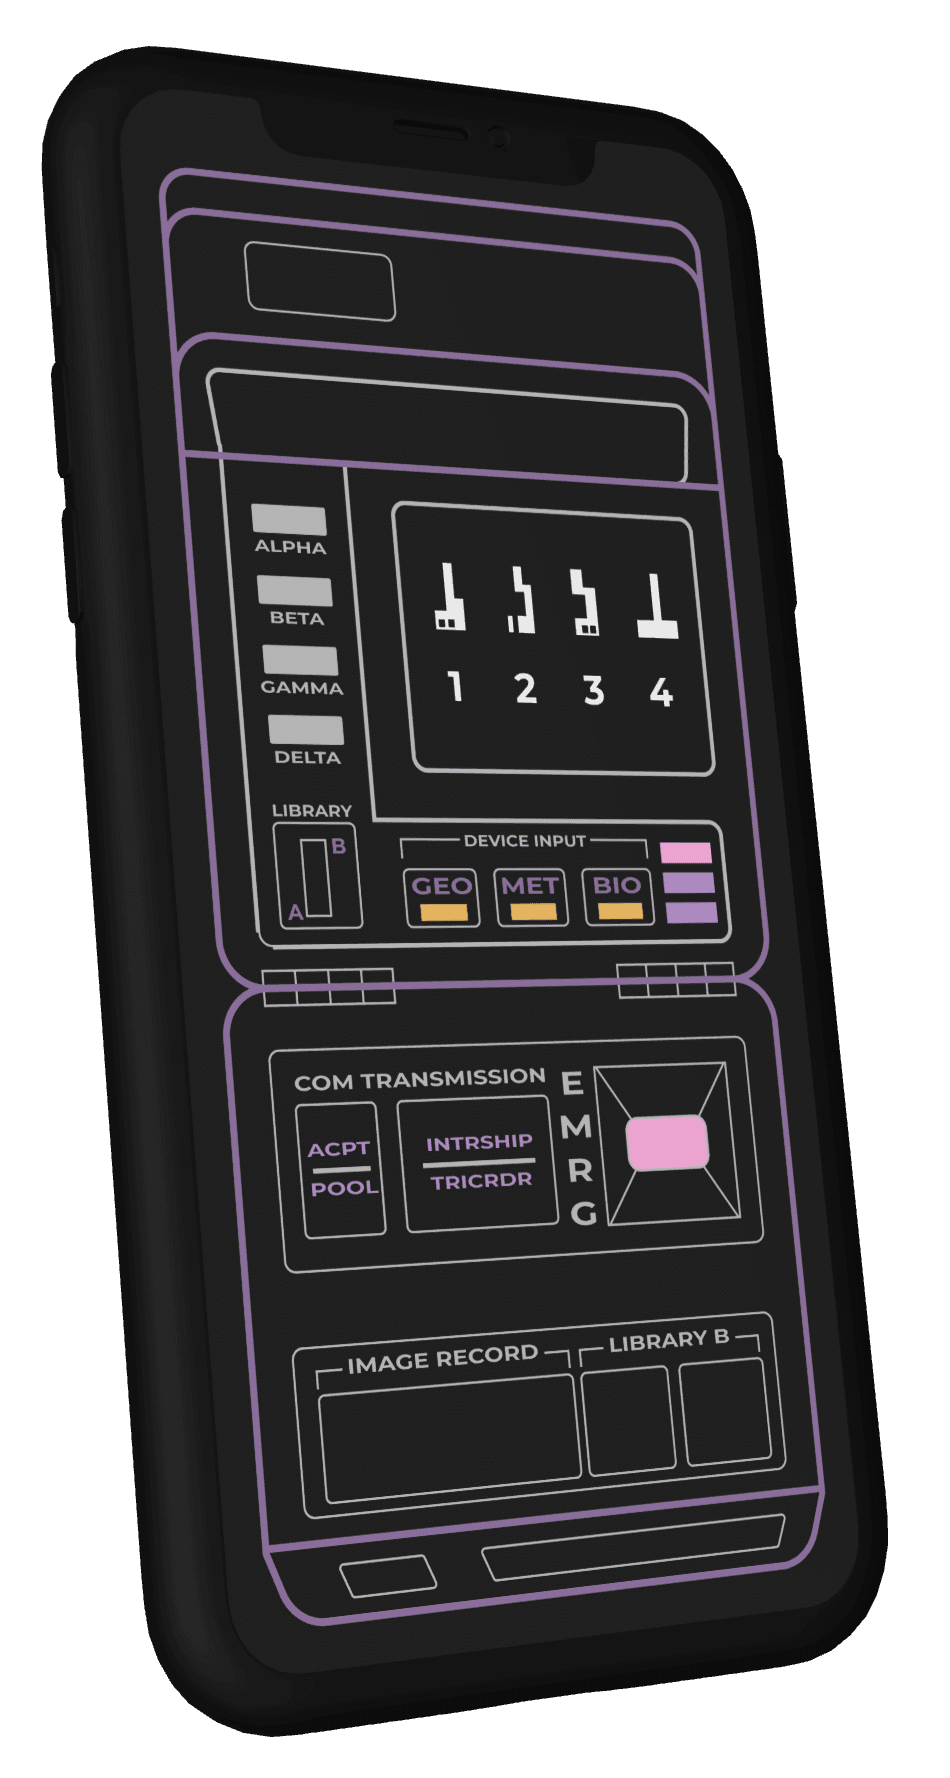
I was able to setup basic puzzles inside Figma using component variants essentially as state machines - as players solved parts of the puzzle, I'd update the variant state to reflect their progress.
For example, in the above puzzle, players had part of each answer on their tricorder (displayed on the player's UI), and needed to work together by sharing their findings and solve the four-digit cypher, which was displayed to all players simultaneously.
In-Game Puzzles
I was able to setup basic puzzles inside Figma using component variants essentially as state machines - as players solved parts of the puzzle, I'd update the variant state to reflect their progress.
For example, in the above puzzle, players had part of each answer on their tricorder (displayed on the player's UI), and needed to work together by sharing their findings and solve the four-digit cypher, which was displayed to all players simultaneously.
Master Systems Display
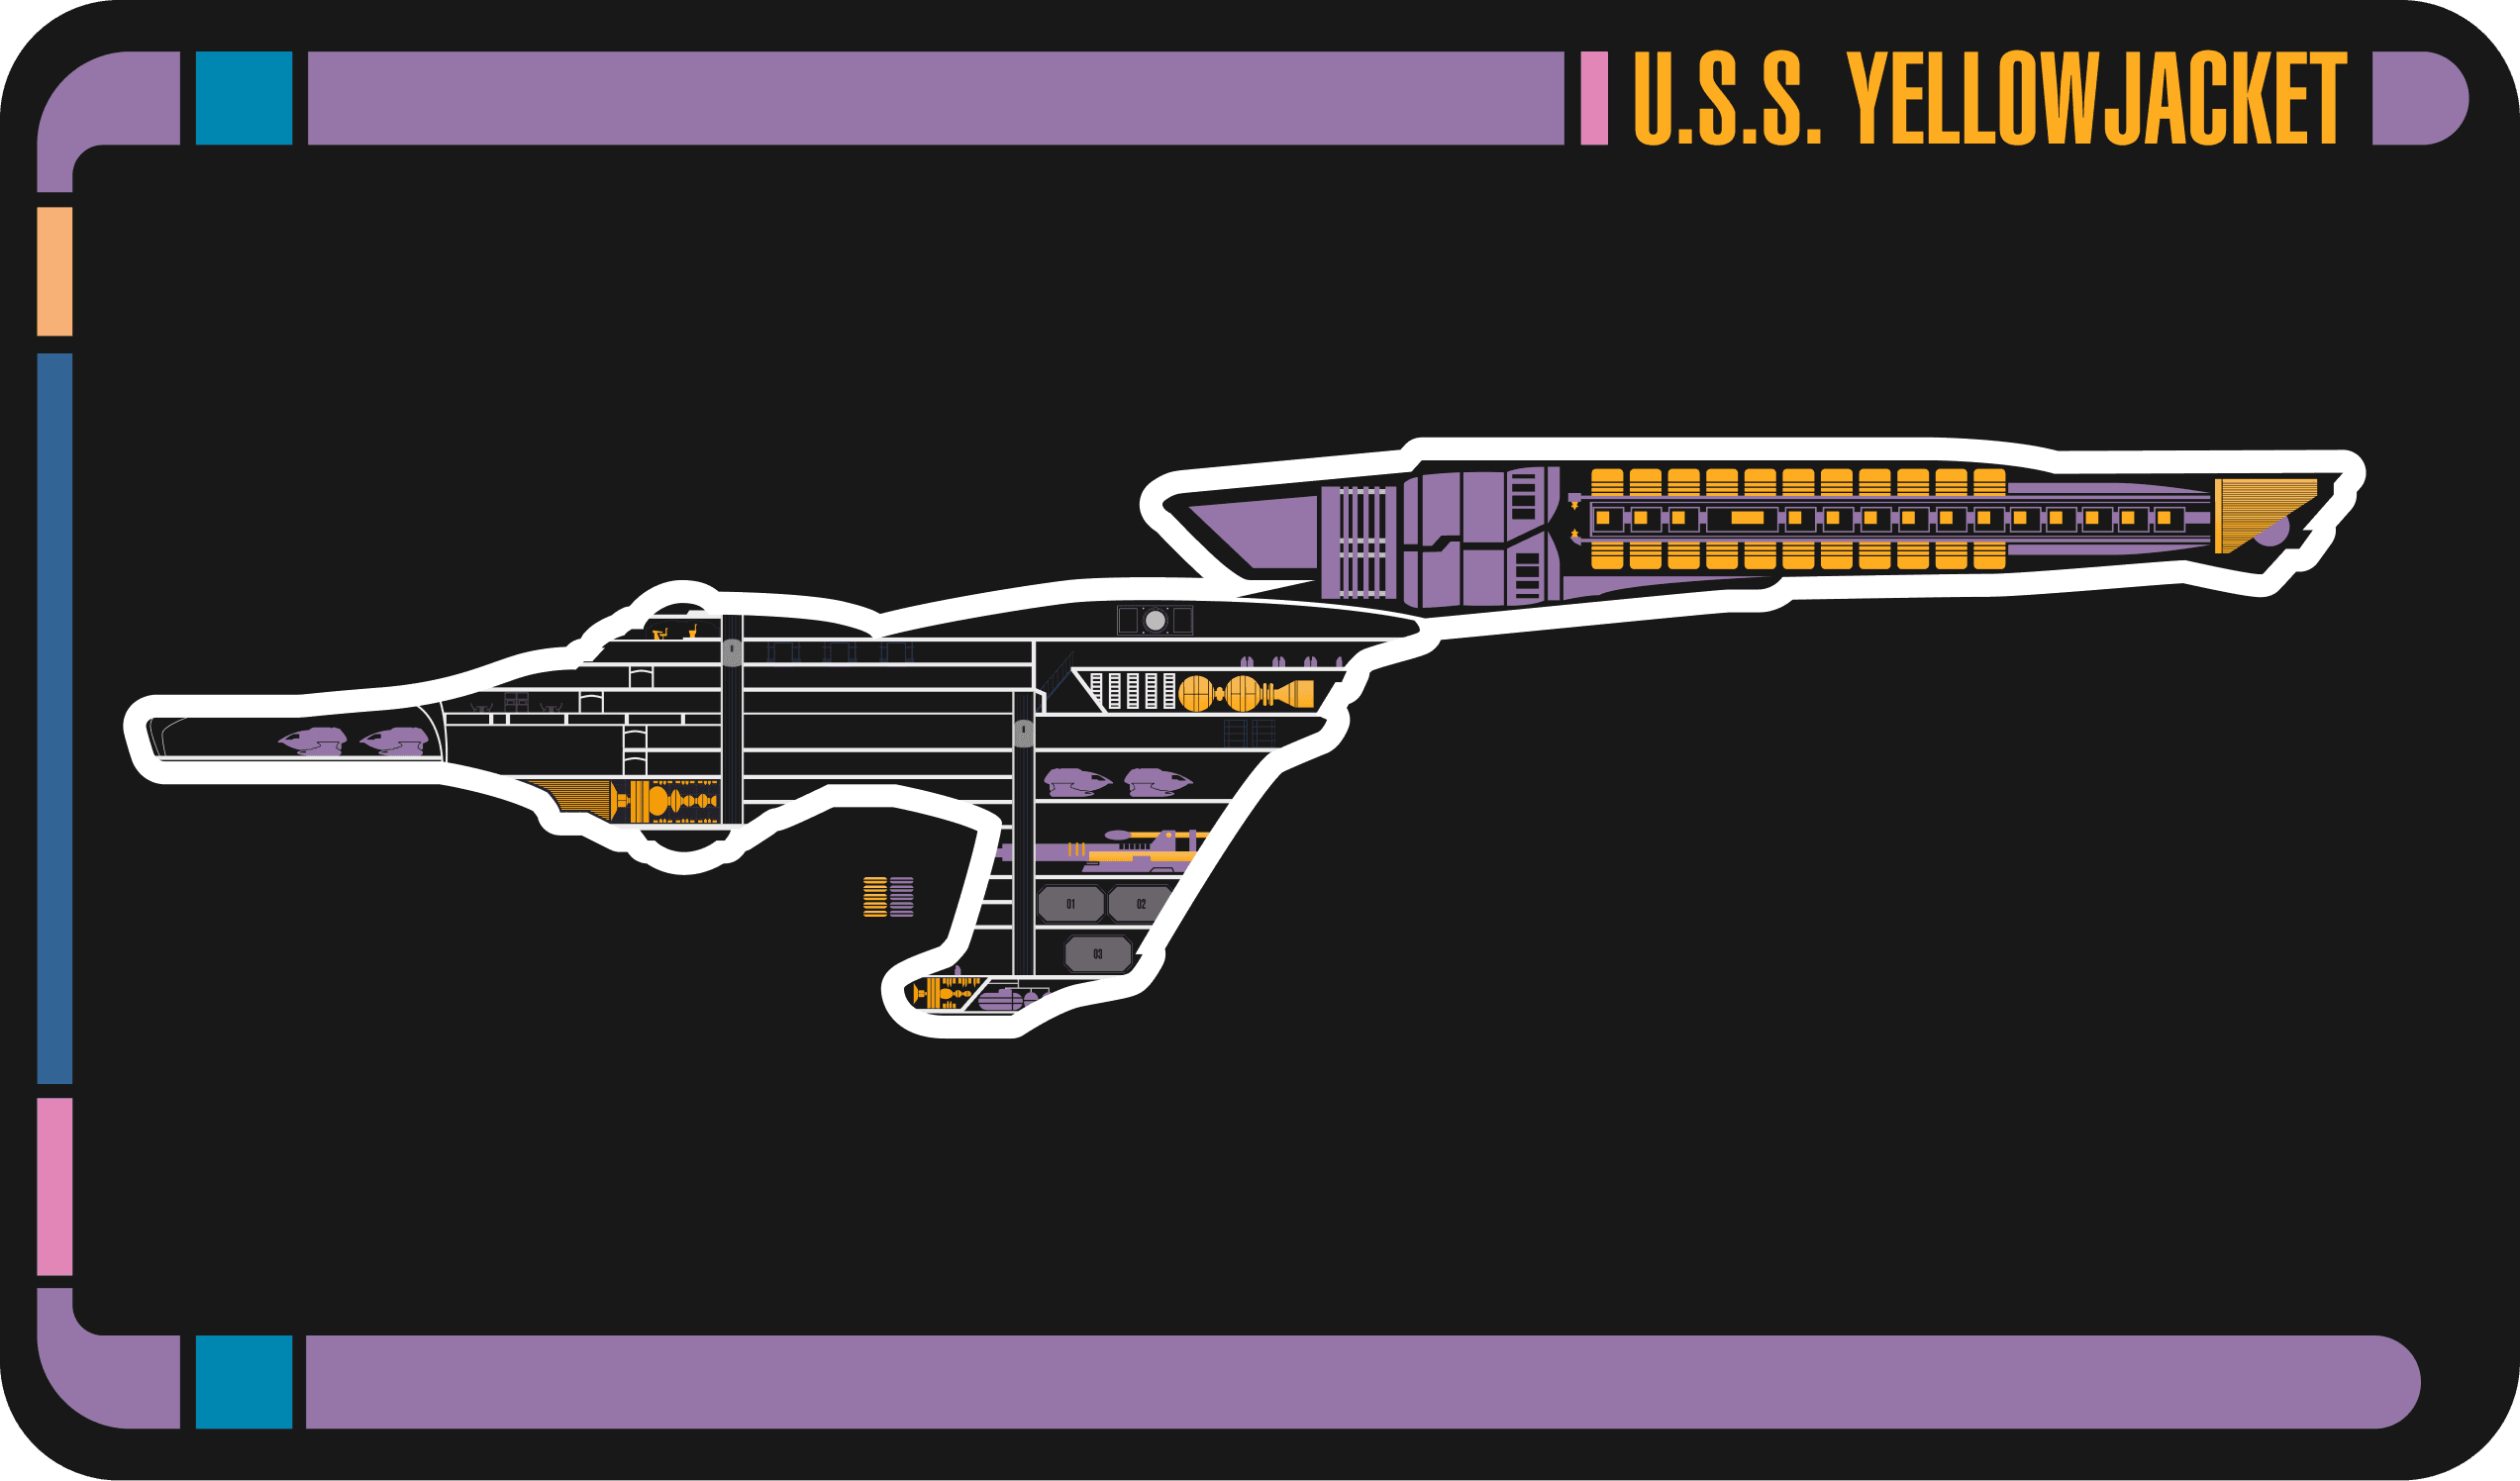
The Master Systems Display (MSD) is a classic piece of Star Trek art, that represents a cross-section of the ship's systems.
Rather than display the entire MSD at once, I made each room as a component, and gave each of those components a Hidden and Revealed state, so that as the players explored the ship, this diagram expanded out.
As gameplay progressed, I updated these components to include Damaged or Disabled states so I could use this as a gameplay asset to view the status of the ship.
Master Systems Display
The Master Systems Display (MSD) is a classic piece of Star Trek art, that represents a cross-section of the ship's systems.
Rather than display the entire MSD at once, I made each room as a component, and gave each of those components a Hidden and Revealed state, so that as the players explored the ship, this diagram expanded out.
As gameplay progressed, I updated these components to include Damaged or Disabled states so I could use this as a gameplay asset to view the status of the ship.

Custom Maps
While I was able to find gameplay maps online, these maps often didn't suit the style of my prototype, and were impossible to customise.
So that I could quickly generate my own maps that suited the style of our visuals, I created a library of basic map components that I could quickly put together to build rooms and areas for my players to play it.
I also used variants for many of these, such as open and closed states for doors. Because I'm a Figma nerd, I've included a screenshot of the Figma file itself.
The only thing I couldn’t really do in Figma was communication and dice-rolling, but thanks to Discord and the Majel bot, that was easily solved. This might even be solvable in Figma with a dice rolling plugin and the Figma chat plugin, but we were already Discord natives so that felt comfortable.
I would highly recommend anyone with some design skills to try this for themselves — not only is it fun, but this was a great exercise in designing a really complex, intuitive prototype for a really unusual use case.
For those interested, you can view the master file here or launch the player prototype here.
If you’ve got questions on how to do this yourself or would just like to chat about it, feel free to get in touch!

